react-navigation 6.x版本的安装、传参、navigator的使用等介绍(part2)。
目前react-navigation的官方文档已经更新到了6.x版本,在官方文档中对于其基本的使用方法也有所介绍,但是对于一些比较复杂的使用场景,或者传参等细节问题并没有给出详细的解决方案。
在这篇文章中,我将介绍Native Stack Navigator的使用以及Drawer Navigation的使用。
Native Stack Navigator
基本用法
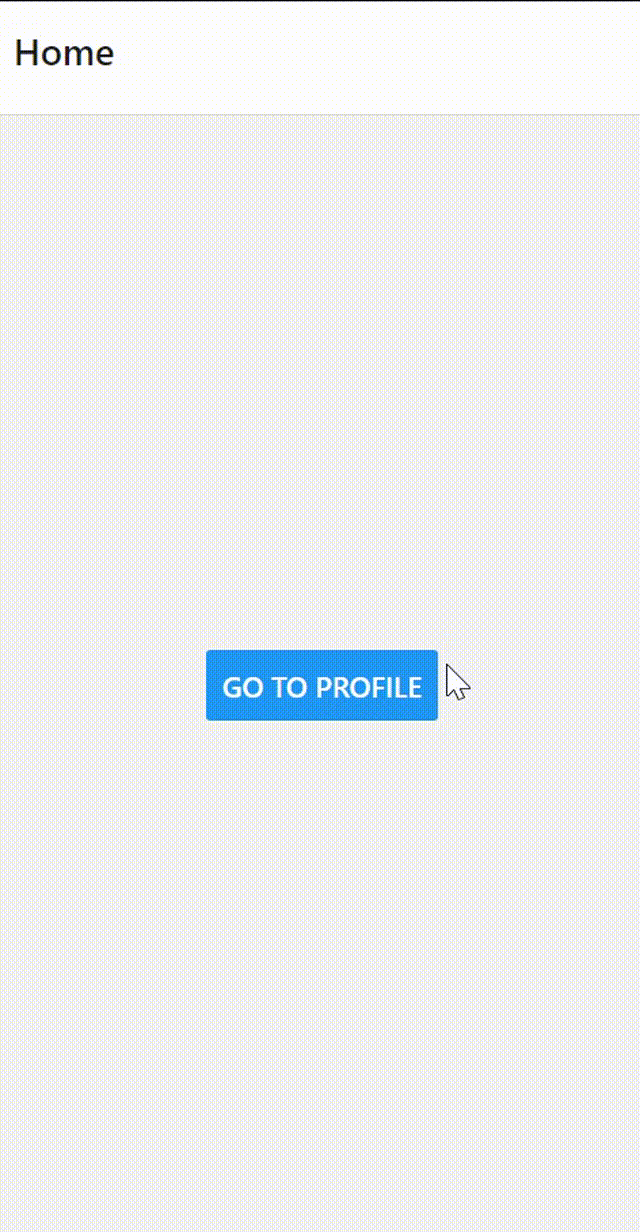
如果不想显示任何导航栏,stack navigator无疑是个最好的选择,这是最基本的页面导航,它维护了一个栈结构,进入一个页面相当于在栈里压入了一个页面,返回操作相当于在栈中弹出一个页面。在官方文档给出了基本的用法:
1
2
3
4
5
6
7
8
9
10
11
12
13
14
15
16
17
18
19
20
21
22
23
24
25
26
27
28
29
30
31
32
33
34
35
36
37
38
39
40
41
42
43
44
45
46
47
48
49
50
51
52
53
54
55
56
57
58
59
60
61
62
63
64
65
66
67
68
| import * as React from 'react';
import { Button, View } from 'react-native';
import { NavigationContainer } from '@react-navigation/native';
import { createNativeStackNavigator } from '@react-navigation/native-stack';
function HomeScreen({ navigation }) {
return (
<View style={{ flex: 1, alignItems: 'center', justifyContent: 'center' }}>
<Button
title="Go to Profile"
onPress={() => navigation.navigate('Profile')}
/>
</View>
);
}
function ProfileScreen({ navigation }) {
return (
<View style={{ flex: 1, alignItems: 'center', justifyContent: 'center' }}>
<Button
title="Go to Notifications"
onPress={() => navigation.navigate('Notifications')}
/>
<Button title="Go back" onPress={() => navigation.goBack()} />
</View>
);
}
function NotificationsScreen({ navigation }) {
return (
<View style={{ flex: 1, alignItems: 'center', justifyContent: 'center' }}>
<Button
title="Go to Settings"
onPress={() => navigation.navigate('Settings')}
/>
<Button title="Go back" onPress={() => navigation.goBack()} />
</View>
);
}
function SettingsScreen({ navigation }) {
return (
<View style={{ flex: 1, alignItems: 'center', justifyContent: 'center' }}>
<Button title="Go back" onPress={() => navigation.goBack()} />
</View>
);
}
const Stack = createNativeStackNavigator();
function MyStack() {
return (
<Stack.Navigator>
<Stack.Screen name="Home" component={HomeScreen} />
<Stack.Screen name="Notifications" component={NotificationsScreen} />
<Stack.Screen name="Profile" component={ProfileScreen} />
<Stack.Screen name="Settings" component={SettingsScreen} />
</Stack.Navigator>
);
}
export default function App() {
return (
<NavigationContainer>
<MyStack />
</NavigationContainer>
);
}
|
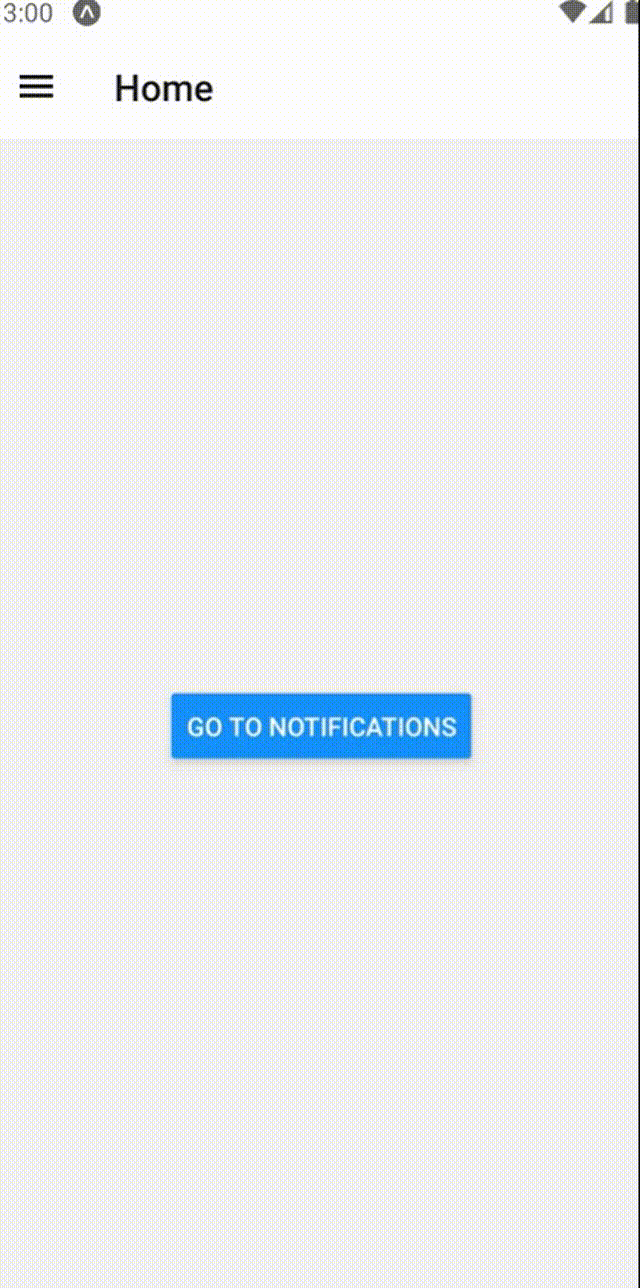
这里createNativeStackNavigator创建了一个stack,在不同的页面之间,点击Button触发navigation.navigate导航到特定名字的页面,或者触发navigation.goBack返回上一级页面,如果我们使用的是真机的话,后退手势也可以返回上一级页面。实现的效果如下:
同样,这里默认还是会显示header的,如果我们不想显示header的话,也可以在Stack.Navigator里面添加headerShown: false属性,原则上第一个页面是打开的默认页面,我们也可以使用initialRouteName指定默认页面,如下所示:
1
2
3
4
5
6
7
8
9
| <Stack.Navigator
initialRouteName="Notifications"{% raw %}
screenOptions={{headerShown: false}}{% endraw %}
>
<Stack.Screen name="Home" component={HomeScreen} />
<Stack.Screen name="Notifications" component={NotificationsScreen} />
<Stack.Screen name="Profile" component={ProfileScreen} />
<Stack.Screen name="Settings" component={SettingsScreen} />
</Stack.Navigator>
|
进阶:不同navigator之间的嵌套
如果我们希望做一个购物网站,浏览页底部显示tab导航栏,详情页面等一些页面不显示底部的tab导航栏,那我们可以将tab导航栏包裹后作为一个stack.screen,而其他不需要显示底部tab导航栏的也作为同级的stack.screen,示例如下:
1
2
3
4
5
6
7
8
9
10
11
12
13
14
15
16
17
18
19
20
21
22
23
24
25
26
27
28
29
30
31
32
33
34
35
36
37
38
39
| import {createBottomTabNavigator} from '@react-navigation/bottom-tabs';
import {NavigationContainer} from '@react-navigation/native';
import {createNativeStackNavigator} from '@react-navigation/native-stack';
const Tab = createBottomTabNavigator();
const Route = createNativeStackNavigator();
export function TabWrapper() {
return (
<Tab.Navigator>
<Tab.Screen
name="首页"
component={HomeScreenWrapper}
options={{headerShown: false}}
/>
.....
</Tab.Navigator>
);
}
export default function App() {
return (
<NativeBaseProvider>
<NavigationContainer>
<Route.Navigator
initialRouteName="Welcome"
screenOptions={{headerShown: false}}>
<Route.Screen name="Detail" component={DetailScreen} />
......
<Route.Screen
name="TabWrapper"
component={TabWrapper}
options={{headerShown: false}}
/>
</Route.Navigator>
</NavigationContainer>
</NativeBaseProvider>
);
}
|
Drawer Navigation
基本用法
Drawer Navigation实现了一个左侧的可收起导航栏,基本使用方法可见官方文档
1
2
3
4
5
6
7
8
9
10
11
12
13
14
15
16
17
18
19
20
21
22
23
24
25
26
27
28
29
30
31
32
33
34
35
36
| import * as React from 'react';
import { Button, View } from 'react-native';
import { createDrawerNavigator } from '@react-navigation/drawer';
import { NavigationContainer } from '@react-navigation/native';
function HomeScreen({ navigation }) {
return (
<View style={{ flex: 1, alignItems: 'center', justifyContent: 'center' }}>
<Button
onPress={() => navigation.navigate('Notifications')}
title="Go to notifications"
/>
</View>
);
}
function NotificationsScreen({ navigation }) {
return (
<View style={{ flex: 1, alignItems: 'center', justifyContent: 'center' }}>
<Button onPress={() => navigation.goBack()} title="Go back home" />
</View>
);
}
const Drawer = createDrawerNavigator();
export default function App() {
return (
<NavigationContainer>
<Drawer.Navigator useLegacyImplementation initialRouteName="Home">
<Drawer.Screen name="Home" component={HomeScreen} />
<Drawer.Screen name="Notifications" component={NotificationsScreen} />
</Drawer.Navigator>
</NavigationContainer>
);
}
|
在Drawer Navigator中也可以用触发navigation.navigate导航到特定名字的页面,或者触发navigation.goBack返回上一级页面,或者使用真机回退手势实现页面的回退;和Tab Navigator一样,同样也可以将Drawer Navigator嵌套到Stack Navigator。样例的效果如下:
进阶:参数传递
假如我们希望使用Drawer Navigator实现一个分类页面,渲染效果基本相同,但是传递的参数不同导致内容不同,为了不简单地将渲染效果的代码简单复制粘贴多遍,造成大量代码冗余,我们可以使用一个SwitchScreen{i}作为中间桥梁,不同的SwitchScreen向最终渲染效果的RenderScreen传递不同的参数,代码如下:
1
2
3
4
5
6
7
8
9
10
11
12
13
14
15
16
17
18
19
20
21
22
23
24
25
26
27
28
29
30
31
32
33
34
35
36
37
38
39
40
41
42
43
44
45
46
47
48
49
50
51
52
53
54
55
56
57
58
59
| import React, {useState} from 'react';
import {ActivityIndicator, Button, View} from 'react-native';
import {createDrawerNavigator} from '@react-navigation/drawer';
const RenderScreen = props => {
console.log('RenderScreen props:', props);
React.useEffect(() => {
....
}
}, []);
return (
.....
);
};
function SwitchScreen1() {
return <RenderScreen props="默认" />;
}
function SwitchScreen2() {
return <RenderScreen props="类别1" />;
}
function SwitchScreen3() {
return <RenderScreen props="类别2" />;
}
function SwitchScreen4() {
return <RenderScreen props="类别3" />;
}
function SwitchScreen5() {
return <RenderScreen props="类别4" />;
}
function SwitchScreen6() {
return <RenderScreen props="类别5" />;
}
const Drawer = createDrawerNavigator();
export default function BrowseScreen() {
return (
<Drawer.Navigator
useLegacyImplementation
initialRouteName="默认"
drawerBackgroundColor="#fda4af">
<Drawer.Screen name="默认" component={SwitchScreen1} />
<Drawer.Screen name="类别1" component={SwitchScreen2} />
<Drawer.Screen name="类别2" component={SwitchScreen3} />
<Drawer.Screen name="类别3" component={SwitchScreen4} />
<Drawer.Screen name="类别4" component={SwitchScreen5} />
<Drawer.Screen name="类别5" component={SwitchScreen6} />
</Drawer.Navigator>
);
|